Build Kit 2.2#
Installation#
Compatibility#
| Maya | 2022 | 2023 | 2024 | 2025 | 2026 |
|---|---|---|---|---|---|
| ✓ | ✓ | ✓ | ✓ | ✓ |
| Python | 2.7 | 3.x |
|---|---|---|
| ✓ |
How to install#
-
Extract the RS_Assets folder from the RS_Assets.zip
-
Extract RS_Build_Kit.pyc from RS_Build_Kit_MAYAVERSION.zip (depending on your Maya Version)
-
Copy RS_Build_Kit.pyc or RS_Build_Kit.py (Studio Version) and the RS_Assets folder to:
If an RS_Assets folder already exists in your folder
If an RS_Assets folder already exists in the location below, please copy the RS_Build_Kit folder (from inside the extracted RS_Assets folder) and paste it into the existing RS_Assets folder in the location.
-
Launch / Restart Maya
-
In Maya, open a Python Tab in the Script Editor and execute :
Attention
Please make sure that there are no Space characters in front of each code line.
Initial Setup Requirements#
Enable Track Selection Order
-
Make sure Track selection order is enabled

For Quad Fill: Set Boundary Options
-
Open the Boundary Options

-
Set the settings as below and save them.

Environment Variables#
-
To set and use a custom folder location, please open the Maya.env file.
-
Add the following lines to the Maya.env file:
MAYA_SCRIPT_PATH = path\to\your\custom\script\folder PYTHONPATH = path\to\your\custom\script\folder RS_TOOLS_PATH = path\to\your\custom\script\folderAttention
- Replace path\to\your\custom\script\folder with the actual path to your scripts.
- Make sure there is no forward slash (/) or backward slash (\) at the end of the path.
Interface Basics#
Tool Menu#
 Mesh / Selection / Layout tools
 Import / Export tools
 Curve tools
 About / Links / Shortcuts / Scale UI
Tool Settings#
Indicator
A blue line underneath an icon indicates that optional tool settings are available.

How to open?
Open the settings with a RMB 2 click.
Position & What settings are open?
-
The settings widget will appear at the bottom of the tool.
-
The background of an icon button turns dark gray to indicate it's settings are currently open.

How to close?
To close the settings page RMB 2 click the active button again.
Tooltips#
- Hover over a button until a tooltip shows up.
- Tooltips include information about available Modifier Alt Ctrl Shift and RMB 2 settings options.

Please make sure that tooltips are enabled!
In Maya's main menu go to:
Windows > Settings / Preferences > Preferences > Interface > Help
and check DisplayToolClips under PopupHelp
Expand / Collapse tabs#
It is possible to expand or collapse all tabs on an active page.
Expand
Ctrl click on
or
or
Collapse
Alt click on
or
or
Note
A settings page will automatically close when expand or collapse all tabs is used.
Keyboard Shortcuts#
It is possible to control aspects of the tools interface with keyboard shortcuts.
Access pages
1 - Mesh Page
2 - Import / Export Page
3 - Curve Page
4 - About Page
5 - Toggle Tool Menu Visibility
Requirements
The tool needs to have focus, for the shortcuts to work.
Expand / collapse tabs
Ctrl + 1 to expand all tabs on the Mesh Page
Alt + 1 to collapse all tabs on the Mesh Page
Ctrl + 2 to expand all tabs on the Import / Export Page
Alt + 2 to collapse all tabs on the Import / Export Page
Ctrl + 3 to expand all tabs on the Curve Page
Alt + 3 to collapse all tabs on the CurvePage
Attention
This only works on the currently active page.
Minimize to main menu
Alt + 5 to minimize the tool

About Page#
Access the About page by clicking on ![]()
The page contains information about the tool, web links and options to set up hotkey shortcuts and scale the UI.
Interface - About Page#

Create Hotkey Shortcuts#

How to: Open Hotkey Editor
Alt + click on the Create Hotkey Shortcuts button to open Maya's hotkey editor.
Info
You can also access the Hotkey Editor under Windows > Settings/Preferences > Hotkey Editor
Scale UI#
- Open About Page
- Choose a UI scale size in the drop-down menu: 100%, 125%, 150%, 200%
- Click the Set UI Scale button
- Close and reload the tool
Edit Mesh#
Interface - Edit Mesh#

Combine & Separate  #
#
-
Combine
Advanced Combine operation
- Clean history (without empty groups)
- Keeps the name of the first selected object
- Stays under current parent
- Option to keep the orientation from the first selected object
- When combining a single group, it keeps the group name

How to use
-
Select 2 or more objects or 1 or more groups
-
LMB 1 click on
to run the script
Add Shift to keep the orientation from the first selected object
-
Separate
Advanced Separate operation
- Clean history (without empty groups)
- Keeps mesh name and adds a _Sep# suffix
- Stays under current parent
- Centers pivots
- Option to keep the orientation from the first selected object

How to use
-
Select 1 or more combined objects
-
Alt + click on
to run the script
Add Shift to keep the orientation from the first selected object
Extract & Duplicate Face  #
#
-
Extract
Advanced Extract operation
- Clean history (without empty groups)
- Keeps mesh name and adds an _Ext# suffix
- Remains under parent
- Centers pivot
How to use
- Select one or multiple faces
- LMB 1 click on to run the script
-
Duplicate Face
Advanced Duplicate Face operation
- Clean history (without empty groups)
- Keeps mesh name and adds a _Dup# suffix
- Stays under current parent
- Centers pivot
How to use
- Select one or multiple faces
- Alt + click on to run the script
Connect  #
#
Various options to connect components.
-
Connect Line
How to use
- Select 2 edges from a ring loop
- LMB 1 click on

-
Connect Diamond
How to use
- Select a triangle face
- Alt + click on

-
Connect Corner
How to use
- Select 2 corner edges from a quad polygon face
- Ctrl click on

-
Connect End
How to use
- Select 3 edges from a quad polygon face
- Shift click on

Append Plus  #
#
Enhanced poly append based on a vertex or edge input.
-
Append Poly
How to use
- Select one vertex in a corner of 2 edges
- LMB 1 click on

Caution!
When a face adjoins the newly created vertex that sits across from the selected vertex, the vertices won't be merged. Please use the Append Bridge operation to create a connecting poly face.

-
Append Bridge
How to use
- Select a border ring edge
- LMB 1 click on

-
Append Ring Loop
How to use
- Select two edges within a ring loop
- Alt + click on

Quad Fill  #
#
Automatically fills a polygon hole
Requirements
Edges
- The edge count needs to be an even number
-
Opposite sides need to have the same edge amount

Enable Track Selection Order
-
Make sure Track selection order is enabled
Set Boundary Options
-
Open the Boundary Options
-
Set the settings as below and save them.
How to use: 1 Corner Edge
Use Case
Quickest solution. Best for caps, planar and cylindrical meshes.
- Select 1 corner edge
- LMB 1 click on
Examples
Plane area

Cylinder cap

Cylindrical mesh with curvature

Tip
If a cylindrical mesh has curvature, choose a corner edge from the side that best defines the curvature
How to use: 2 Corner Edges
Use Case
Essential when two opposing sides have only 2 edges.
- Select 2 corner edges
- LMB 1 click on
Examples


How to use: 3 Edges
Use Case
Essential when the mesh is curved in all directions, but also works with caps, planar etc.
- Select 1 corner edge
- Select the edge right next to it, to define the direction along the loop
- Select 2 corner edge
- LMB 1 click on
Examples
Mesh with curvature

Spherical

How to use: 4 Corner Edges
Use Case
Use this method for more control over the result. Often helpful with caps or when the corner edges are not as clearly defined.
- Select 4 corner edges in a "Z" shape (selection order is important!)
- LMB 1 click on

Mirror  #
#
How to use: Mirror


How to use: Merge Border Vertices
- Combine two objects that have overlapping border vertices
- Select the combined object
- LMB 1 click the Merge Border Vertices button to run the script

Automatic position renaming
Objects and Groups that have L_, R_ or _l_, _r_ position tags in their naming will automatically be renamed when mirrored in the X-Axis.
Groups

Objects

Pivot Position  #
#
Set pivot positions based on an objects bounding box.
How to use
-
Center Pivot: Shift + Alt + Ctrl click on
-
X-Min: LMB 1 click on
- Y-Min: Alt + click on
- Z-Min: Ctrl click on
Add Shift for -Max direction

Component Operations  #
#

How to use: Straighten an edge loop
- Select an edge loop
- Alt + click on


How to use: Restore vertex corner point position
- First select each vertices pair of the neighbouring edges
- Then add the corner vertex
- Ctrl click on

How to use: Clean inset
- Select faces
- Shift click on
-
Filter Window: Adjust slider that all required corner edges are highlighted
Manual control
At this stage it is also possible to add or remove edges manually in the viewport, but make sure they are part of the offset edge loop!
-
Click Accept
- Offset Window: Enter a value or use the PLUS / MINUS buttons to increase or decrease the offset
- Click Accept

45 Mesh Angle  #
#
Rotate a face selection by 45° from a specified anchor point.
How to use
-
With face selection:
-
Without face selection:
- Select a single border edge, which will be the anchor point
-
LMB 1 click on

-
Choose how to proceed in the option window:

- Accept: Proceeds with the result on display.
- Opposite: Rotates the face selection in the opposite direction.
- Undo: Returns to the original state.

Instances  #
#
Convert instances to objects.

How to use
Settings

Randomize Transforms  #
#
Randomize object or component transforms.

How to use
- RMB 2 click to open the settings widget
- If you want to affect indivual objects in a combined mesh, check Combined Object Mode
- Check what transforms you want to affect and enter range values.
- Choose between Relative or Absolute Transform (Relative adds the new value to the existing transform value of the object.)
- Choose an Axis
- X-Axis : LMB 1 click
- Y-Axis : Alt + click
- Z-Axis : Ctrl click
- X-Axis : LMB 1 click
Object Space / World Space
- The default transform will adjust the object in Object Space
- Add Shift for World Space
Settings

Tiny Toolbox  #
#
How to use: (Un)Lock nodes and their transforms
- Select objects or groups
- Lock / Unlock:
- Lock Nodes : LMB 1 click
- Unlock Nodes : Shift click
- Lock Nodes : LMB 1 click
Easily find locked nodes
- Use the "Select by Type or Status"
 function to easily find locked nodes
How to use: Individually Group Each Object
- Select objects
- Alt + click on

How to use: Create Locators
- Create Locator at Pivot Position
- Select Objects and/or Groups
- Ctrl click
- Create Locator at the Center
- Select Objects or Components
- Ctrl + Shift click
- Create Locator at every selected Component
- Select Components
- Ctrl + Shift + Alt click
Select#
Interface - Select#

Topology  #
#
Analyze mesh geometry and detect invalid polygons.

How to use: Icon Basics
How to use: Find Topology Issues
- RMB 2 click to open the Settings widget
- Choose a Topology Type and click the button:
- Triangles: 3-sided polygons
- Quads: 4-sided polygons
- N-Gons: polygons with 5+ sides
- Non-Manifold: geometry that cannot be unfolded into a flat surface
- Lamina: faces sharing all their edges
- Concave: polygons with interior angles > 180°
- Stars: vertices connected to 5+ edges
- Holes: gaps in mesh topology
- Float Verts: isolated vertices with no edge connections
- Stray Verts: vertices connected to only 2 edges
- Hard Edges: sharp transitions between faces
- Border Edges: open mesh boundaries
- LMB 1 click to find border edges
- Alt + click to convert the border edges to curves
- Overlap: geometry occupying identical space
- LMB 1 click to check Objects: meshes with coincident bounding boxes
- Alt + click to check Faces: coplanar faces in the same location
- Intersections: self-intersecting or inter-object geometry conflicts
- LMB 1 click to find intersections
- Alt + click to convert the 'RS_Intersection_Collection' to curves
Poly Count / Wireframe on shaded
The Poly Count information and Wireframe on shaded mode are great for extra feedback.
- Poly Count:
- Find the option under Display > Heads Up Display > Poly Count
- or Alt click to toggle the Poly Count display
- Wireframe on shaded:
- Go to the viewport menu and click the following icon

Settings

Angle  #
#
Grow a polygon face selection based on a set edge normal angle.

How to use
- RMB 2 click to open the settings widget.
- Set an angle value within the settings page.
- LMB 1 click to run the script.
Tip
Use the slider to interactively change the angle.
Settings

Shortcut
If used as a shortcut through the hotkey editor, the angle value is always 15°.
The angle value and the interactive slider can only be used with and within the tool.
Nth Edge  #
#
Selects every nth edge within a Loop, Ring or Border edge.

How to use
Settings

Fill Shell  #
#
Temporarily cut a mesh with an edge selection and select one or multiple of the resulting shells.

How to use
- Make a loop or any closed edge selection
- Click to start the process
- Choose one or multiple shell(s)
- Press Ok in the option window to end the process.
Percentage  #
#
Randomly selects a specified percentage from the current object or component selection.
How to use
Settings

Component Count  #
#
Find objects that have the same component count as the selected source or specify a poly count range.
How to use
-
Choose a mode
A. Based on a source object
- Select an object (the source)
B. Based on a value range
- RMB 2 click to open the settings widget
- Switch On value mode
- Set a poly count range
- Specify the search scope
-
Choose a component type
- Face - LMB 1 click
- Vertices - Alt + click
- Edges - Ctrl click
- UVs - Shift click
- Face - LMB 1 click
Settings

Name  #
#
Search and select objects by name or characters.
How to use
Settings

Type / Status #
Search and select objects by type or their status.
How to use
Settings

Selection Sets  #
#
Save and manage object and component selections.
How to use: Quick Set
- Select Components or Objects
- Alt click : Create a new or overwrite an existing Quick Set
- Ctrl click : To add further selections to the current Quick Set
- LMB 1 click : Select the Quick Set
How to use: Selection Set List
- RMB 2 click to open the settings widget
- Check "Enable Sets List"
- Select Components or Objects
- Buttons:
- Add: Adds the current selection as a Set to the list
- Save / Load
- LMB 1 click: Save Sets to a file
- Alt click: Load Sets from a file (Overwrites the current list!)
- Shelf: Creates a shelf button from the current selected list item
- List Operations:
- Delete: Select an item from the list and press Del to remove it
- Rename: Double click a list item to rename it
- Select: Select an item from the list and LMB 1 click
Toggle between Quick Set and Set List Mode
- Shift click to toggle between the modes
Settings

Pattern  #
#
Select by component pattern.

How to use
- Select 2 components within a ring or loop (Face, Vertex or Edge)
- LMB 1 click to select further components with the same pattern along the loop
Crease  #
#
Select creased edges. Set / Apply a crease value. Output / Print crease value.
How to use: Select all creased edges
- Select objects
- LMB 1 click
How to use: Select creased edges by value or range
How to use: Set / Apply Crease
- Select edges
- RMB 2 click to open the settings widget
- Check Crease Value (If unchecked, Default value is 2)
- Set value
- Alt + click
How to use: Remove Crease
- Select creased edges
- RMB 2 click to open the settings widget
- Check Crease Value (If unchecked, Default value is 2)
- Set value
- Alt + Shift click
How to use: Output / Print Crease value
- Select creased edges
- Ctrl click
- Check Script Editor or Command Line for output message
How to use: Open Crease Set Editor
- Shift click
Settings

Layout#
Interface - Layout#

Place  #
#
Place meshes or groups on a target mesh, right under the mouse cursor location.

Before you start
Check the source objects Y-axis orientation and set a desired pivot location (the point where it gets placed on the target mesh) before adding it to the list.
How to use
- RMB 2 click to open the settings widget
- Select objects or groups
- Click the Add button to add them to the list
- List Operations:
- Delete: Select an item from the list and press Del to remove it
- Clear List: Click on the Clear button to empty the whole list
-
Select list items to make them available for placement

-
Options:
- Random Mesh: Check to place the list objects in a random order
- Instance: Check to place objects as instances
- Random Rotation: Check to add random rotation upon placement
- Random Scale: Check to add random scaling upon placement
- LMB 1 click to start
Settings

Paint  #
#
Paint meshes or groups on a target mesh.

Before you start
Check the source objects Y-axis orientation and set a desired pivot location (the point where it gets placed on the target mesh) before adding it to the list.
How to use
- RMB 2 click to open the settings widget
- Select objects or groups
- Click the Add button to add them to the list
- List Operations:
- Delete: Select an item from the list and press Del to remove it
- Clear List: Click on the Clear button to empty the whole list
-
Select list items to make them available for placement
-
Options:
- Random: Check to place the objects in a random order
- Instance: Check to place iobjects as instances
- Time: Change the value to control the paint density
- Lower value (Min: 0.01) = faster placement
- Higher value (Max: 0.20) = slower placement
- Random Rotation: Check to add random rotation upon placement
- Random Scale: Check to add random scaling upon placement
- LMB 1 click to start
Settings

Distribute  #
#
Distribute overlapping objects or groups based on their bounding box or a value.

How to use
- RMB 2 click to open the settings widget
- Select a distribution mode, based on their Bounding Box (BBox) or by Value
- Option to add Spacing between the objects
- Enter a Move value for Value mode
- Select 2 or more overlapping objects or groups
- Choose an Axis
- X-Axis : LMB 1 click
- Y-Axis : Alt + click
- Z-Axis : Ctrl click
- Add Shift for negative direction
- X-Axis : LMB 1 click
Settings

Duplicator  #
#
Distribute object or group duplicates based on their bounding box or a value.

How to use:
- RMB 2 click to open the settings widget
- Options:
- Gizmo Directions: Check to move duplicates in the objects Manipulator direction (Only works with objects)
- Instance: Check to duplicate instances
- Move by settings:
- Select a duplicator mode, based on their Bounding Box or by Value
- Specify the amount of copies
- Option to add Spacing between the objects
- Enter a Move value for Value mode
- Select an object or a group
- Choose Axis:
- X-Axis - LMB 1 click
- Y-Axis - Alt + click
- Z-Axis - Ctrl click
- Add Shift for negative direction
- X-Axis - LMB 1 click
Settings

Snap  #
#
Snap objects or groups to selected components.

Before you start
Check the source objects Y-axis orientation and set a desired pivot location (the point where it gets placed on the target mesh) before adding it to the list.
How to use: Snap
- RMB 2 click to open the settings widget
- Select objects or groups
- Click the Add button to add them to the list
- List Operations:
- Delete: Select an item from the list and press Del to remove it
- Clear List: Click on the Clear button to empty the whole list
-
Select list items to make them available for placement
-
Options:
- Random: Check to snap the objects in a random order
- Instance: Check to snap instanced objects
- Select components
- LMB 1 click to snap
Constraints
This function creates constraints and doesn't delete them right away to maintain interactive control. To automatically remove the constraints, please read the "How to use: Delete pointOnPolyConstraints" section below.
Snap Groups
When you snap groups this function creates additional constraints and locators (which will be parented under a group called "BUKI_SNAP_LOCATORS_grp"). Please don't modify the group or the locators within for the script to work properly. To automatically remove the constraints and the locators, please read the "How to use: Delete Group Constraints and Locators" section below.
How to use: Delete pointOnPolyConstraints
- RMB 2 click to open the settings widget
- Choose a search scope in the settings under "Delete Constraints"
- If you chose Selection, select objects with constraints
- Alt click to start the process
How to use: Delete Group Constraints and Locators
- Ctrl click to start the process
This cleanup ignores your selected search scope in the settings and affects the whole scene
Settings

Radial  #
#
Duplicate objects or groups in a radial fashion.

Before you start: Anchor point
Set your anchor point by adjusting the object or group pivot.
How to use
- RMB 2 click to open the settings widget
- Set anchor point: Adjust your object or group pivot
- Select object or group
-
- X-Axis : LMB 1 click
- Y-Axis : Alt + click
- Z-Axis : Ctrl click
Choose an Axis
Toggle rotation direction
Add Shift to toggle between positive and negative rotation direction within the chosen axis
- X-Axis : LMB 1 click
-
Tweak options:
- Copies: Amount of duplicates
- Rotation: Specifies how much the duplicates will be rotated by (negative value will rotate in opposite direction)
- Instance: Converts duplicates to Instances
- Distribute Evenly: Distributes the duplicates evenly within a circle
-
Wrap up the process:
- Done Button:
- LMB 1 click - Finish process and maintain current settings
- Alt click - Finish process and reset all settings
- Cancel Button:
- LMB 1 click - Cancel process but maintain current settings
- Alt click - Cancel process and reset all settings
The Instance Checkbox is always going to reset to it's default state.
- Done Button:
Wrap up!
Don't forget to click Done or Cancel when you finished to tweak the settings.
Live Object Axis and Bake
If you rotate an object it's Live Object Axis changes, while the rotation axis looks correct - This leads to unexpected radial duplications. Display the Live Object Axis, adjust the pivot to correct the axis and bake the new orientation.

Display Live Object Axis
- Select the object
- Hold Ctrl + Alt + RMB 2 to open the Marking Menu
- Go to Axis >
- Choose Live Object Axis
How to bake a pivot
- Go to the Modify tab in Maya's main menu
- Under the Pivot separator line click on Bake Pivot
Settings

Import / Export#
Interface - Import / Export#

Import#
Import .obj files
Import .obj files as a combined mesh, separated meshes or as Blendshapes.
Load the objExport plugin
- Go to Windows > Settings/Preferences > Plug-in Manager
- Search for objExport.mll
- Check Loaded and Auto load
How to use
Settings

Import .fbx files
Load the fbxmaya plugin
- Go to Windows > Settings/Preferences > Plug-in Manager
- Search for fbxmaya.mll
- Check Loaded and Auto load
How to use
- LMB 1 click

- Navigate to the file location and select files to import
Import .abc files
Load the AbcImport plugin
- Go to Windows > Settings/Preferences > Plug-in Manager
- Search for AbcImport.mll
- Check Loaded and Auto load
How to use
- LMB 1 click

- Navigate to the file location and select files to import
Import .ma or .mb files
How to use
- Import:
- .ma files : LMB 1 click

- .mb files : Alt click
- .ma files : LMB 1 click
- Navigate to the file location and select files to import
Export#
Export .obj files
Load the objExport plugin
- Go to Windows > Settings/Preferences > Plug-in Manager
- Search for objExport.mll
- Check Loaded and Auto load
How to use
- RMB 2 click
 to open the settings widget
- Choose an export mode
- Set the preferred options to On or Off
- Select objects to export
- When the Export mode is set to As blendshapes, select objects that have blendshapes
- LMB 1 click
- Navigate to the save location
- When the Export mode is set to Combined, enter a file name
Settings

Export .fbx files
Load the fbxmaya plugin
- Go to Windows > Settings/Preferences > Plug-in Manager
- Search for fbxmaya.mll
- Check Loaded and Auto load
How to use
Settings

Export .abc files
Load the AbcExport plugin
- Go to Windows > Settings/Preferences > Plug-in Manager
- Search for AbcExport.mll
- Check Loaded and Auto load
How to use
Settings

Export .ma or .mb files
How to use
Settings
Utilities#
Obj fix
Clean up a mesh by exporting and immediately re-importing the mesh as an obj.
How to use
- RMB 2 click
 to open the settings widget
 -
- LMB 1 click on the "..." button and specify a save path
Set Save path
Set as default path
Alt click on the "..." button if you want to set the current path as the default path upon startup
-
Reassign Shader: Check the box if you want the the script to reassign the current Shader when the mesh gets re-imported
- Select objects
- LMB 1 click to start the process
Settings

Curve Tools#
Interface - Curve Tools#

Rebuild  #
#
Rebuild curves based on their length.
How to use
- RMB 2 click to open the settings widget
- Enter a division value
- Select curves
- LMB 1 click to start the process
Analysis
- Works in conjunction with the Analysis
 tool to determine the division value
 - Select all your curves and get the length of the shortest curve (See Analysis section)
Open Maya's Rebuild Tool
Alt click ![]()
Settings

Pivot To Origin  #
#
Sets the pivot to the curve origin.

How to use
- Select curves
- LMB 1 click to start the process
Snap To Surface  #
#
Snaps the curve origin to the closest point on a specified surface.

How to use
- First select curves
- Then Shift select the surface
- LMB 1 click to start the process
Change Direction  #
#
Reverse or equalize curve directions.
How to use: Reverse
- Select curves
- LMB 1 click to start the process
How to use: Equalize Directions
- First select the curve with the correct direction
- Then Shift select all other curves
- Alt click to start the process
Point Range  #
#
Select a specific point range on one or multiple curves at once.

Range Limit
When the range is higher than the curves point amount, the curve will be ignored.
How to use
Settings

Convert Edges  #
#
Convert selected edges to curves.

How to use
- Select edges
- Convert:
- Curve Degree 3: LMB 1 click
- Curve Degree 1: Alt click
- Curve Degree 3: LMB 1 click
Create Center Curve  #
#
Generate an objects center curve from edge loops (cables, cylinders, etc.)

How to use
- Select an object (cables, cylinders, etc.)
- Select an edge loop that runs across the mesh
- LMB 1 click
Attention
For best results, use objects without caps. If necessary, create a duplicate and adjust the temporary mesh for curve generation.
Analysis #
Inspect curve attributes.
How to use
- RMB 2 click to open the settings widget
- Select a single curve and LMB 1 click to get the
- Length of the curve
- CV count
- Span count
- Degree count
- Select multiple curves and LMB 1 click to get the
- Shortest curve
- Longest curve
Additional Operations
- Alt click : Select Shortest Curve
- Ctrl click : Select Longest Curve
- Shift click : Reset Textfields
Settings

Extruder  #
#
Convert curves to geometry.
How to use: Sweep Presets
- Select curves
-
Convert to geometry: - Cable: LMB 1 click
1 2 3 4 5 6 7 8 9 10 11 12 13
 - **Rope**: <kbd>Alt</kbd> click   - **Pipe**: <kbd>Ctrl</kbd> click   - **Box**: <kbd>Shift</kbd> click   -
Click on the mesh and use the Sweep Mesh Creator within Maya's Attribute Editor to tweak the result:
1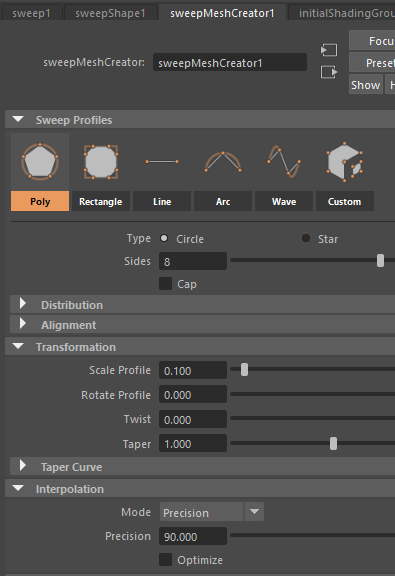
How to use: Legacy Cable
Before you start
Use the Rebuild ![]() function to recreate the curve with a good amount of and evenly distributed vertexes.
function to recreate the curve with a good amount of and evenly distributed vertexes.
- RMB 2 click to open the settings widget
- Tweak available options: - Sections - Radius - Taper
- Select curves
-
Convert to geometry: Ctrl + Alt click
1
Settings

Distribute Along Curve  #
#
Interactive object distribution along curves

How to use
- RMB 2 click to open Settings
- Select a curve and one object to duplicate along it
- LMB 1 click
- Adjust Settings as needed
- Finish the operation:
How to use: Scale
- Enable Scale in Settings
- Set Min Value (left field) and Max Value (right field)
- Choose a Mode:
- All: scales all objects equally using Min Value only
- Rnd: randomly scales objects between Min and Max values
- Taper: gradually scales objects from Min to Max along the curve
- Alt + click Taper to swap Min/Max values
How to use: Rotation
- Enable Rotate in Settings
- Set Min Value (left field) and Max Value (right field)
- Choose Axis
- Choose a Mode:
- All: rotates all objects equally using Min Value only
- Rnd: randomly rotates objects between Min and Max values
- Twist: gradually rotates objects from Min to Max along the curve
- Alt + click Twist to swap Min/Max values
Attention
Ensure the geometry is at the origin with its transforms frozen.